 Size - don't really know. Something around size 4 years + approximately :).
1 thread KidSilk Haze and 1 thread Wollmeise 100%. Needle 3.5 for everything but the ribbing which I did with 2.5 (and one thread Wollmeise) on the sleeve and 3 and both threads on neckline.
Gauge 22 x 32.
Cast on 480. Knit six rows of st stitches. Next row join the ends and continue knitting around. I did continue one round and then started stripes with one round of each color 8 times. Then I did knit 4 rounds in the first color.
On next round decrease by knitting two together the whole round – i.e. decrease to 240.
On next round place markers – 6 in total. The first at the start of the round, the next after 40 stitches, continue and place the remaining 4 after each 40 stitches
On next round change to brown. Knit brown for 20 rounds. (A better drawing of the flowers will be posted here in a day or two)
 I started the flowers on the third brown round and used the chart as shown. Note that you will need to decrease in the middle of the flower chart. What I did do was to make sure that I did start the row with the flower which has one continued middle row of pink. Then on the decrease row the decrease will be made immediately before and after every second of these flowers.
On the 8th round decrease as follows.
Marker for beginning of round - Knit 2, ssk (one decreased), knit 32, k2together, knit 2. Then you are at second marker. Repeat the decrease 5 more times – i.e. in total 12 decreases.
Then on every 10th round continue to decrease 12 stitches – i.e. on the first 32 is reduced to 30, on next to 28 and so on.
Make stripes as you like it. I did have 5 dark red and 5 rounds pink and did the decrease on the 4th of the pink rounds. Make sure not to start a new color on the decrease round, because then the “line” around will not be straight.
Decrease in total 10 times – remaining stitches 120. I did change to brown after completing the pink stripe on the 10th decrease. On the tenth decrease, take away all markers except the beginning of round and the opposite side. Knit 4 rows. From hereon the front and back are knitted separately.
On the fifth row decrease 3, knit to 3 before next marker, decrease 6, knit to end, turn. Purl back and start with decreasing. Turn, knit, decrease 1, turn. Purl back, decrease 1. Then continue to knit/purl until you have knitted/purled 30 rows. On next row cast off the 14 middle stitches. Purl back (to the middle). Turn cast off 3, knit to end. Turn. Purl to end. Turn. Cast off 2. Knit to end. Turn. Purl to end. Turn. Cast off 1. You have now 13 stitches left. Continue for 6 rows. Set stitches aside. Do the other side of the back similar.
Front. Decrease as for back for sleeve. Cont. knitting/purling 24 rows. On next, cast off the 6 middle stitches, then the next four, three, two (on start of each knit row) and then continue decreasing 1 until you have 13 left. Knit until the piece is as long as the back. THEN knit one more row and sew front and back together. NB the extra row is to make the stripes continue with two rows of each color.
Make the other half of the front equal.
Sleeves. Cast on 44 on needle 2.5. Knit rib – 2 knit 2 purl for 6 cm. Change to needle 3.5 and start striping. The green stripes are made with three row of each color. Increase 2 stitches on every 6th row. Then after 12 green stripes, change to pink and to stripes with 4 rows and continue the increase on every 8th row. Knit until sleeve is as long as you want.
Cast off the first three knit to end. Turn, Purl and cast off 3. On next row and on the start of every row decrease 1 stitch until you have knitted 20 rows. Then decrease 2 stitches on the next 6 rows. Then 3 on the next two rows and then cast off the remaining on the next row.
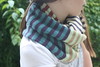
I did make a green “ribbon” for the flowers. What I did do was to pick up a little less than one stitch per row on the body. Knitted three rounds. Turned outside in. Picked up – on a separate needle one stitch per row from the sleeve. Then I had more stitches on the sleeve than the body. I marked the top of the sleeve and the body and with the body inside out and the sleeve put into the sleeve “hole” in the body, I knitted together the body and the sleeve, however as often as I needed I did take two stitches from the sleeve to one from the body. When body and sleeve are joined I did cast off all stitches on next row. Turn work back again. Then I did make embroidery as shown on pictures.
Below - a picture with flowers only on one of the green bands

Neckline. Pick up around neck – all stitches in front and back and approximately 3 per 4 rows on each side. Rib 1 knit 1 purl for 5 rows, then k2 together, one cast for one round, then rib 1 knit 1 purl for 5 rows. Cast off.
I did make a crochet border at the sleeves and the hem, mainly because I needed to ad that color.
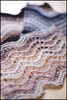
Close up of flowers.


Den kjolen ble utrolig lekker, og jeg regner med at den er myk og varm å ha på også.
ReplyDeleteSo so beautiful ! and why I am a boy's mother only ??? :(
ReplyDeleteThanks so much its a real pleasure to read your blog !
så artig kjole du har strikket
ReplyDeleteDen ble aldeles skjønn! Herlig Flower Power dette :) Ha en fin kommende uke sammen med alt det lekre garnet ditt.
ReplyDeleteWow! That is an amazing dress! The embroidered flowers are adorable. And you made it so quickly.
ReplyDeleteFor en gøyal og søt kjole! Riktig noen supre garnkvaliteter du har valgt, det er sikkert en deilig kjole å ha på seg. Fargevalget er særdeles heftig, me like!
ReplyDeleteHilsen Mien/Retz
I love this dress! It is amazing and any little girl would love it.
ReplyDeleteI love it. The colors are perfect and the whimsy just makes me grin stupidly. This is a work of art.
ReplyDeleteSå herlig og fargerik kjole! Broderiene var med å løftet hele inntrykket, og jeg er sikker på at mottageren blir happy!
ReplyDeleteFantastisk kul kjole, den ble utrolig lekker :D
ReplyDeleteJeg bare digger denne kjolen! Har vært innom og sett på den mange ganger. Den hadde vært så fin på jenta mi! :-) Må tenke på om jeg skal forsøke å strikke den i løpet av 2010.
ReplyDeleteØnsker deg samtidig et riktg godt nyttår :-)