 Yarn; approximately DK. I’ve used one strand of sock yarn – Wollmeise 100% and one strand of KidSilk Haze (shawl).
Needles; 2.5 for ribbing, 3.5 for anything else.
Gauge; 24 X 32
Size – approximately 4-6 years
Note the rnd of each color (stripe) has to be divided with 2 to make the side “bar” nice.
Body
Cast on 92 stitches (loosely) on needle 3.5. Knit garter stitches for 16 rows (counting every row). Set aside.
Cast on additional 92 st and repeat.
Join by knitting one row of st stitches. Place marker at each end.
NEXT rnd Rnd I – purl 5, knit 6, purl 2, knit until 13 stitches remain before next marker, purl 2, knit 6, purl 5, marker, purl 5, knit 6, purl 2, knit until 13 stitches remain before next marker, purl 2, kit 6, purl 5. End of rnd.
Rnd II – knit all.
Rnd III – repeat Rnd I
Rnd IV – knit all
Rnd V – Repeat Rnd I
Rnd VI – knit 5, put 3 stitches on a cable needle, held back of work, knit the next 3 stitches, knit the three stitches from cable needle, knit until you reach the other side of the work and the “6 knit” stitches. Put 3 stitches on cable needle, held in front of work, knit the next 3 stitches, knit the 3 stitches from cable needle, knit 10 stitches, put next 3 stitches on a cable needle, held back of work, knit the next 3 stitches, knit the three stitches from cable needle, knit until you reach the other side of the work and the “6 knit” stitches. Put 3 stitches on cable needle, held in front of work, knit the next 3 stitches, knit the 3 stitches from cable needle, knit the remaining 5 stitches on rnd.
Rnd I to VI forms the cable pattern in each end.

AT THE SAME TIME AS KNITTING THE ABOVE RNDS make the stripes as you go.
Knit until the work measures 29 cm. On next rnd, cast off 5 stitches on each side of both markers (10 for each sleeve). The knit each side separately. Next 2 row cast off 2 stitches at start of needle, and then next 2 row cast off 1 stitches on start of needle. Now each needle shall start and stop with the 6 cable stitches.
Set aside.
Sleeves.
Cast on 44 on needle 2.5 with double strand of KidSilk Haze only. Start ribbing 2 r 2p. Knit two rib rnds. Cut yarn and start with one strand of the other yarn. Knit rib until the rib measures appr. 6 cm. Note the reason for only having one strand of yarn is to make a more close fit.
THEN, on next row, still with only one strand, increase to 58 stitches. This is the last rnd of rib.
Next row, change to needle 3.5 and start using both strands and st stitches. Knit one rnd and place two markers – one for the start and one after 29 stitches.
Then
RND I – purl 3, knit 18, purl 2 knit 6, marker, knit 6, purl 2, knit 18, purl3, marker.
RND II – knit
RND III – repeat rnd I
RND IV – knit
RND V – repeat rnd I
RND VI– knit 23, put 3 stitches on cable needle, held in front of work, knit the next 3 stitches, knit the 3 stitches from cable needle, put next 3 stitches on a cable needle, held back of work, knit the next 3 stitches, knit the three stitches from cable needle, knit 23 end of rnd.
These 6 rnds are the cable pattern
AT the same time – make stripes.
AT the same time, increase 2 stiches appr. every 2 cm 10 times – as follows. Knit 2 increase one, knit until 2 left before end marker, increase 1, knit 2.
AT the same time – the increased stitches shall start to form the same pattern as you have on the body, so you have to make sure that the 3 purl at the start and end of rnd + the increased stitches is knitted in that cable pattern. Also make sure that you manage to do all 10 increases – i.e. if you want a shorter sleeve, make the increases more often.
NB MAKE SURE TO CAST OFF THE 5 STITCES ON “SAME” CABLE PATTENR ROW AS FOR BODY.
Knit until sleeve measures 30 cm. Cast of 5 stitches on each side of marker for beginning of rnd. Next 2 row cast off 2 stitches at start of needle, and then next 2 row cast off 1 stitches on start of needle. Now the needle shall start and stop with the 6 cable stitches.
Set aside.
Make another sleeve.
TOP
Put all stitches on one needle sleeve, body, sleeve, body AT the same time place start of rnd marker – Find the place where the body stitches on the previous end of rnd for body all are on the right needle and sleeve stitches on left needle. Place the 5 last stitches from the body to the other needle and place marker. Then you will see that those 5 stitches will form a cable patten together with the 5 first stitches from the sleeve. Start all rnds here and also make all changes of stripes from here. Place marker. Continue with the cable pattern HOWEVER NOTE
- The raglan decreases shall be on each side of the “2 stitches garter stitches”, i.e. the stitches as a round start with. I made sure to make all decreases at an all knit row /cable row and not on a rnd wherein I made purl stitches.
- The cable pattern in the raglan decrease shall be on the same rnd as the cable on the middle of the sleeve.
- The raglan cable pattern is as follows – knit 2, 3 stitches on cable needle, in front of work, knit next three, knit cable needle stitches, knit 2 – knit until cable in middle of sleeve, continue that cable pattern, knit until you have 3 stitches left on “sleeve”, set on cable needle and held back, knit the next 3 stitches from body, knit the 3 stitches from cable, continue till next sleeve.
The raglan decrease start at the first rnd as follows.
Knit 2, either knit next 6 stitches or make a cable if you are on a cable rnd, knit 2, knit the next two together, continue till you have 7 stitches left on what was the former sleeve, ssk (decrease 1), knit 2, next 6 is knit or cable, knit 2, k2tog. Repeat for the other side. I.e. on each raglan decrease row you decrease in total 8 stitches.
Next rnd, no decreases AND this rnd please make sure to continue with patten it is a purl round in the pattern.
Continue decreasing on every second row in total 17 times. Cut yarn.
Move start of rnd to the mid front – i.e. move stitches until you find the middle of the front of the body. Put the first 5 and last 5 stitches on a thread. FROM now on you have to stop knitting on the rnd as this mark the set aside for neck band.
Continue striping, cable pattern and decreasing for ragland.
At the same time, on beginning of each row, set aside 2,2,2,1,1,1.
Continue knitting until 10 rows from the start row wherein you set aside for mid front.

NOTE The raglan decrease will continue into the cable pattern, making sure that the decreases is made on the middle of sleeve cable pattern, and that you make the last decreases so that the middle cable will continue with fewer stitches.
Note you will “run” out of raglan decrease stitches against the neck. That ok continue decreasing on all other raglan decrease places.
I did stop with a cable row
On next ROUND, change to needle 2.5, pick up all set aside stitches and also stitches on the decrease rows enough to avoid holes. Start ribbing – BUT THIS TIME WITH TWO STRANDS. I did make the rib double (i.e. turned the band to the inside – i.e. then you need to make it twice as long as it shall show)– you can choose not to do that. The neck band should measure 2,5 cm. Cast off.
 Hood.
Hood.Cast on 143 stitches, on needle 2, two strands.
Rib for 2.5 cm. Continue in st.stitches – i.e. knit on knit row and purl back.
ON first row and the next 12 rows, decrease one stitch in each end – i.e. 2 stitches decreased each row. Make the decrease one stitch from start-end of row.
Knit until it measures 10 cm. Knit to 4 stitches before middle stitch, ssk, knit 3, k2tg, knit remaining. Purl next row. Make same decrease on next knit row. Continue decreasing in total 12 times.
Continue until the hood measures 21 cm measured over the 3 middle stitches. Cast off.
Sew to necband (inside). Weave in ends. Sew holes under sleeves. Finished with knitting.

If you want a frog - you may make it now. I did place it at the lover front of the sweater. As I only had a "not well made drawing" you have to make do by looking at this picture.


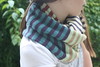


This is a super sweater! I looked at the first picture and thought how great it looked than saw you give the pattern! Awesome! Then I saw it was a raglan sweater Love it! Then I saw the cable sleeves Love cables! Then I saw the sweet frog! If that wasn't enough greatness I saw the hood!
ReplyDeleteOMG then came the beads on the frog!!!!
Thank you so much for the pattern but you should sell it I think it would be a big hit.
aha! Der kom bildene:-)
ReplyDeleteFlott genser, med hette og alt.
Og frosk, ja det er bra saker det er klart;-D
This is adorable!!
ReplyDelete...makes me wish I knew how to knit! :)
Heather
http://woollove-functional-fiberart.blogspot.com/
Fargerik og original genser! Jeg falt for den lille frosken nederst på genseren! :)
ReplyDeleteThe frog is so cute. ^^
ReplyDeleteVeldig, veldig søt genser!!!
ReplyDeleteHeisann!
ReplyDeleteFant deg inne på bloggen til Ullhedina og falt fullstendig for frosken du har strikket. Nydelig fargeglad genser! Tror jeg må forsøke meg på en slik til tiåringen når bare jula er oversått...
Flott blogg du har med masser av herlige strikkearbeider, jeg kommer garantert innom igjen
God helg! :)